How To Create Access Point For Wifi
This Article Applies to:
Archer C1200 , Archer C5400 , Archer A2600 , Archer AX55 , Archer C4 , Archer C5200 , Archer C5 , Archer AX10 , Archer C2 , Archer AX51 , Archer C59 (EU) , Archer C50 V3.0 , Archer AX96 , Archer C5 V4 , Archer C5v , Archer C6U , TL-WR940N( V5 V6 ) , Archer C80 , Archer C8 , Archer C3150 , Archer C9 , Archer AX50 , Archer C20 V4 , Archer C6 , Archer C7 , Archer AX90 , Archer AX6000 , Archer C5400X , Archer C25 , Archer C24 , Archer A20 , Archer A64 , Archer C2 V1 , Archer C60 , Archer C2600 , Archer A1200 , Archer C21 , Archer C20 , Archer C64 , TL-WR820N , TL-WR840N( V3 V4 V5 V6 ) , Archer C2 V3 , Archer AX1800 , Archer AX206 , TL-WR844N( V1 ) , Archer C59 , Archer C58 , Archer AX4200 , Archer C3200 , Archer C900 , Archer A2 , Archer AX75 , Archer AX4400 , Archer C3000 , Archer AX73 , Archer A10 , Archer A54 , Archer AX4800 , Archer C50 , Archer C1900 , Archer C55 , Archer C54 , Archer A2300 , TL-WR841N( V12 V13 V14 ) , TL-WR740N( V7 ) , Archer C20i , Archer C5 v4.0 , Archer A6 , Archer A7 , Archer AX72 , Archer A5 , Archer GX90 , TL-WR845N( V3 V4 ) , Archer A8 , Archer A9 , Archer C5 Pro , Archer C2(EU) , Archer AX68 , Archer C2300 , Archer AX5300 , Archer C1210 , Archer AX23 , Archer AX20 , Archer C3150 V2 , Archer C4000 , Archer AX21 , Archer A3000 , Archer C2700 , TL-WR850N( V1 ) , Archer C7i , Archer AX1500 , Archer C90 , Archer AX60 , Archer AX11000 , Archer AX3200 , Archer AX3000
This article will guide you to set up your TP-Link 11N wireless router as access point, which could transform your existing wired network to a wireless network.
First of all, please check whether your TP-Link router has Operation Mode option on the left side menu. You may login the web interface of TP-Link wireless router to figure it out by referring to How do I log into the web-based Utility (Management Page) of TP-Link wireless router?
Case 1. If there has Operation Mode menu on the web interface of TP-Link router to switch working modes, please follow the instructions below step by step.
1. Connect the power adapter to the router and turn on the router.
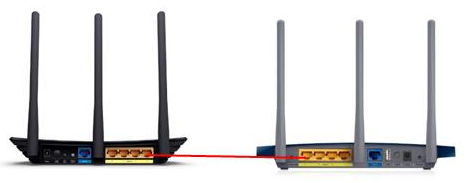
2. Connect the router to your wired host router's Ethernet port via an Ethernet cable as shown above.
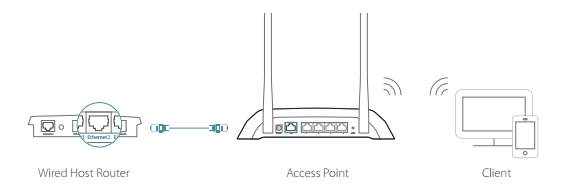
3. Connect a computer to the router via an Ethernet cable or wirelessly by using the SSID (network name) and password printed on the bottom label of the router.
4. Enter http://tplinkwifi.net in the address bar of a web browser. Useadmin for password, and then clickLogin.
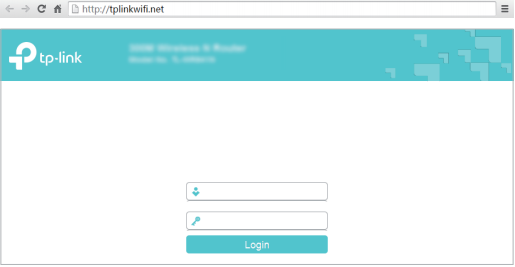
Note: If the above screen does not pop up when you use IE Web-browser, it means that your IE Web-browser has been set to a proxy. Go to Tools menu > Internet Options > Connections > LAN Settings, in the screen that appears, cancel the Using Proxy checkbox, and click OK to finish it.
5. After successfully login, selectAccess Point mode and follow theQuick Setup to complete the configuration.
Note: If you want to change the default SSID (network name) and the password, please follow Quick Setup to complete the configuration.
6. Enjoy! Connect to the wireless network by using the SSID (wireless name) and password of the router.
Case 2. If there is no Operation Mode menu on the web interface of TP-Link router, here are some instructions for you.
1. Log into the router's web management page.
2. Go toNetwork -> LAN on the side menu and change theLAN IP address of your TP-Link N router to an IP address on the same segment of the main router. This IP address should be outside the main router's DHCP range.
Example: If your DHCP is 192.168.2.100 -192.168.2.199 then you can set the IP to 192.168.2.11

Note: After changing the LAN IP address, a reboot will be required and you will need to log into the TP-Link N router with the new IP address.
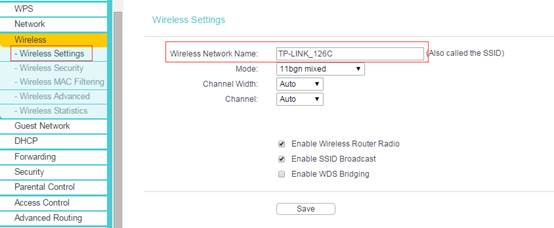
3. Go toWireless-> WirelessSettings and configure the SSID (Network name). Select Save .
4.Go to Wireless -> WirelessSecurity and configure the wireless security. WPA/WPA2-Personal is recommended as the most secure option. Once configured, click Save .
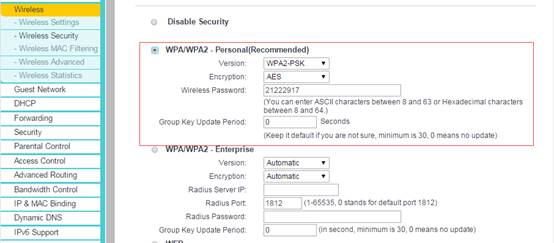
Note: If using a dual band router, repeat this process for the 5GHz band as well.
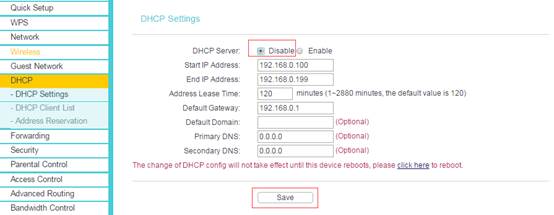
5. Go to DHCP - > DHCP Settings and select Disable the DHCP Server. Select Save .
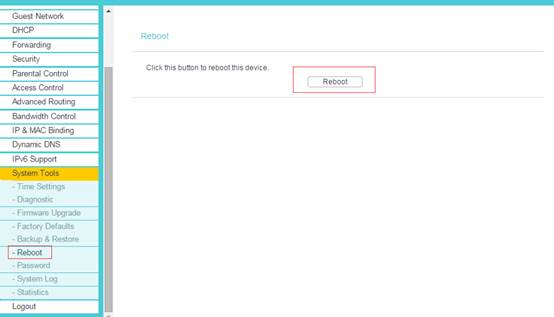
6. Go to System Tools - > Reboot and select Reboot to reboot the device.
7.Use an Ethernet cable to connect the main router to your TP-Link N router through their LAN ports (any LAN ports may be used). All other LAN ports on your TP-Link N router will now grant devices Internet access. Alternatively, any Wi-Fi device can now access the Internet through your TP-Link N router by using the SSID and Password set up in the above steps.
Get to know more details of each function and configuration please go to Download Center to download the manual of your product.
How To Create Access Point For Wifi
Source: https://www.tp-link.com/us/support/faq/1384/
Posted by: hubbardandome.blogspot.com

0 Response to "How To Create Access Point For Wifi"
Post a Comment